One of the features I wanted for my Raspberry Pi NTP Server system was an LCD screen that provides information on the state of the system. Things I wanted to display were a real-time clock, GPS information, NTP information, etc. To do that, I decided to use the Adafruit I2C/SPI Backpack. The backpack mounts on an LCD display and provides the I2c/SPI interfaces.

Unlike other backpacks, including those from Adafruit, this is really just an IO expander. It doesn’t provide a layer to manage the lower level Hitachi HD44780U LCD Display. For example, the Adafruit USB/Serial backpack manages the initialization of the display, and the low level details of sending commands like clear screen. With that kind of device, you can actually just send output to the serial port the backpack creates and the text is displayed.
Since the backpack doesn’t handle initializing the LCD, or managing the IO to it, you have to create a device driver to do this. This is somewhat hard. When I wrote the Java version I spent hours trying to figure it out only to realize that I hadn’t adjusted the contrast.
The backpack uses a Microchip MCP23008 IO expander to provide the I2c/SPI interfaces. This expander provides 8 IO lines that can be written and read via I2C or SPI. Four of the IO pins are connected to the D4-D7 lines on the HD44780U, and 3 of the lines are used for the RESET pin, ENABLE pin, and R/W pin, leaving one pin unconnected.
The best resource for understanding things the underlying LCD is the Hitachi HD44780U datasheet. It describes the initialization sequence for 4bit/8bit mode, and documents the commands to do things like clear the screen, position the cursor, etc.
A good resource for understanding how to talk to the device I2C/SPI backpack is the Adafruit Arduino driver source code.
To interface with the device, I chose to use the periph.io golang/conn package. Using this package, it was possible to create code that would write to the MCP23008. The MCP23008 is a nifty little chip that provides 8 IO ports and makes them accessible via I2C/SPI. In addition to providing the IO ports, it provides interrupt capabilities for handling pin stage changes. To learn about it’s capabilities, refer to the datasheet.
In my Drawer of WondersTM, I actually have 4 different LCD displays so I was interested in creating code that would allow me to interchangeably use them for this project. For example, I have a Matrix Orbital USB LCD device, a Sparkfun SerLCD device, and a display powered by the Adafruit USB backpack. To make them interchangeable, I created a Go LCD interface.
type LCD interface {
    // Enable/Disble auto scroll
    AutoScroll(enabled bool)
    // Return the number of columns the LCD Supports
    Cols() int
    // Clear the display and move the cursor home.
    Clear()
    // Set the cursor mode. You can pass multiple arguments.
    // Cursor(CursorOff, CursorUnderline)
    Cursor(mode ...CursorMode)
    // Move the cursor home (1,1)
    Home()
    // Return the min column position.
    MinCol() int
    // Return the min row position.
    MinRow() int
    // Move the cursor forward or backward.
    Move(dir CursorDirection)
    // Move the cursor to arbitrary position (1,1 base).
    MoveTo(row, col int)
    // Return the number of rows the LCD supports.
    Rows() int
    // Turn the display on / off
    SetDisplay(on bool)
    // Write a set of bytes to the display.
    Write(p []byte) (n int, err error)
    // Write a string output to the display.
    WriteString(text string) (n int, err error)
}
The interface defines the command that all of my LCD devices are capable of. Now, I can create generic code that uses any implementation of the LCD interface.
To handle the details of interfacing with the Hitachi HD44780 chip, I created a HD44780 interface:
type HD44780 struct {
    w    io.Writer
    mu   sync.Mutex
    rows int
    cols int
    on   bool
    cursor bool
    blink bool
}

// Function definitions to implement the LCD interface.
func (lcd *HD44780) Clear() {
    lcd.w.Write(getCommand(clearScreen))
    time.Sleep(2 * time.Millisecond)
}
Finally, to represent the backpack, I created a Backpack package. Note that because the LCD member begins with an initial capital, it’s exported and available to code using the backpack.
type AdafruitI2CSPIBackpack struct {
    LCD *HD44780
    mcp *mcp23008.MCP23008
    on  bool
}
// Now the commands to talk to the display using the MCP23008

func (bp *AdafruitI2CSPIBackpack) SendCommand(commands []LCDCommand) error {
    var err error
    _, err = bp.mcp.WriteGPIOPin(rsPin, bool(modeCommand))
    if err != nil {
        log.Print(err)
    }
    for _, command := range commands {
        bp.write4Bits(byte(command >> 4))
        bp.write4Bits(byte(command))
    }
    return err
}
func (bp *AdafruitI2CSPIBackpack) write4Bits(value byte) error {
    writeVal, err := bp.mcp.ReadGPIO()
    value = value & 0x0f
    writeVal &= 0x83
    writeVal|=(value << 3)

    if err != nil {
        return err
    }

    _, err = bp.mcp.WriteGPIO(writeVal)

    writeVal|=0x04
    _, err = bp.mcp.WriteGPIO(writeVal)

    writeVal &= 0xfb
    _, err = bp.mcp.WriteGPIO(writeVal)

    return err
}

func NewAdafruitI2CSPIBackpack(conn conn.Conn, rows, cols int)
             *AdafruitI2CSPIBackpack {
    mcp, err := mcp23008.NewMCP23008(conn)
    if err != nil {
        log.Fatal(err)
    }
    bp := AdafruitI2CSPIBackpack{mcp: mcp}
    bp.LCD = NewHD44780(&bp, rows, cols)
    bp.init()
    return &bp
}
Now I can create a display and write text to it:
func main() {
    bp := adafruit.NewAdafruitI2CSPIBackpack(conn, 4, 20)
    bp.SetBacklight(1)
    bp.LCD.Clear()
    bw.WriteString("Hello!")
}
Scrolling Text
One of the downsides to the 20×4 LCD display is sometimes you just have more text than will fit on a line. To handle that, I created a function that implements horizontal scrolling. The interface for the scroller is:
type LCDScroller struct {
    lcd     lcdlib.LCD
    lines   []scrollInfo
    mu      sync.Mutex
    newData chan struct{}
    stop    chan struct{}
}

// Create a scroller
// Create a new LCD Scroller attached to the specified
// lcd display.
func NewLCDScroller(lcd lcdlib.LCD) *LCDScroller {
    scroller := LCDScroller{lcd: lcd,
                    newData: make(chan struct{}, 1),
                    stop:    make(chan struct{}, 1),
                    lines:   make([]scrollInfo, lcd.Rows())}

    for i := 0; i < lcd.Rows(); i++ {
        scroller.lines[i] = scrollInfo{}
    }
    return &scroller
}

// Set the content lines to be displayed on the LCD. Number of lines
// should not exceed the number of LCD display lines. If the number
// is exceeded, the extra lines are dropped.
func (scroller *LCDScroller) SetLines(lines []string) {
  // the code to scroll goes here
}

func main() {
    // create scroller
    scroller:=utils.NewLCDScroller(bp.LCD)
    scroller.SetLines([]string{"hello!"})
}
Another nice capability built into the scroller is that if a line is updated, it finds the offset within each line of the first change, and the length of the changed text. Since each character written requires 10 I2C transactions, optimizing this is helpful. So, if a line displaying a real time clock is updated, and only the seconds value is update, only one byte is written to the display.
Conclusion
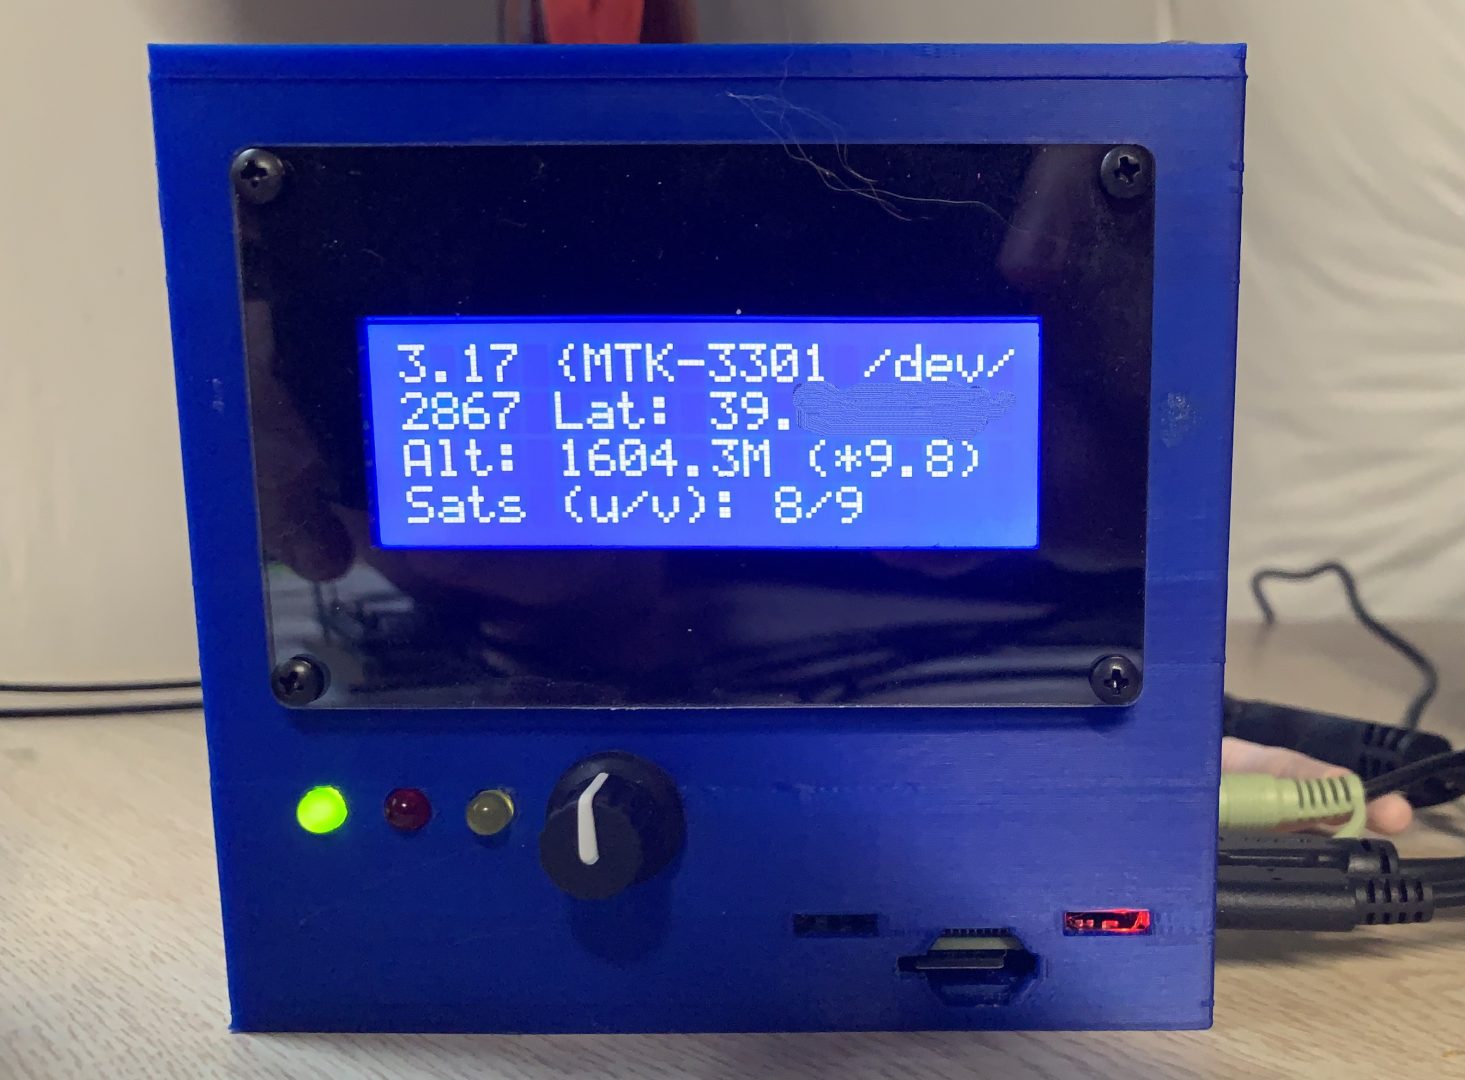
The finished project works really well. In the photo, the rotary switch can be used to change between different displays.
Because I used Golang’s interface feature, I can create different packages that implement the LCD interface allowing me to easily change the hardware without big changes to the code.
To download the complete source code, visit my github.com page.