![]()
![]()
![]()
![]()
|
|
|
|
|
The Custom Field Creation Wizard gives you a simple way to create your own custom field sets. To get to this screen, select the Toolbox Icon | Edit Custom Fields from the menu. Then click on the Wand icon located right of the title. Keep in mind that the Wizard limits what you can do with the custom field definitions. For additional capabilities, refer to the connectDaily Source Code Guide.
Once you have created the custom input tab, you must edit your calendar's definition to include the new custom tab.
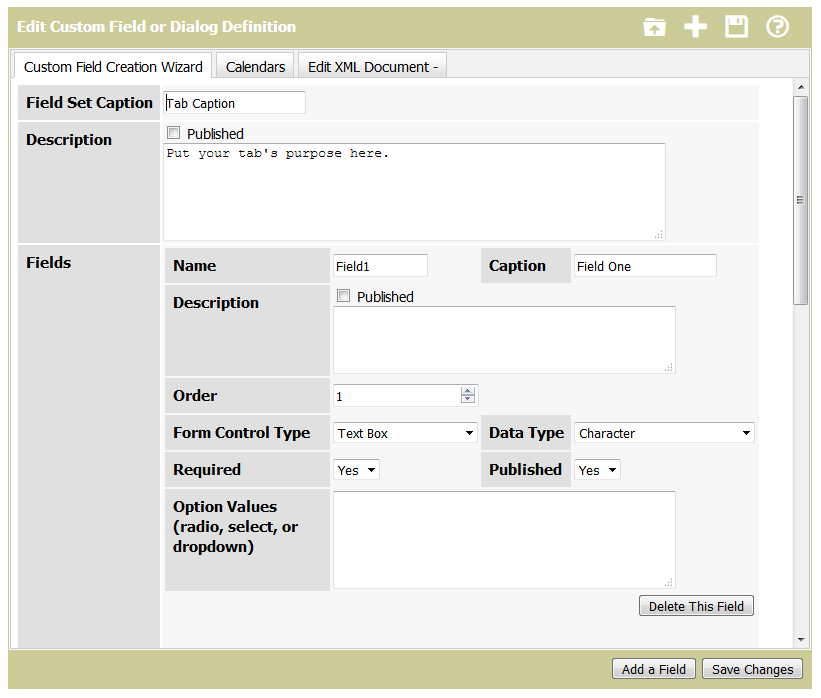
Tab Caption - Once you create a Custom Field set, those Fields will show up as an additional tab on the edit Item screen. This Field is the name of the tab that will appear.
Description - Put a short description of the tab and it's Fields here. If you check Published, then this content is displayed on the input form.
For each Custom Field you want to create, you must specify the attributes for the Field.
Name - This is the name of the Field. The name should be short and not contain spaces.
Caption - This is the caption that will be associated with the input Field. This should be a brief description of the Field.
Description - The description of the input field. If you check published, then the content is displayed on the input form.
Order - This is the order the Fields will appear. You can move a Field up or down by changing its order number.
Form Control Type - This is the type of input Field control the browser should create. Examples would be Text Fields, Dropdown Lists, etc.
Data Type - This is the type of data that should be gathered. For example, you have a Field for Number of chairs, you can set the Field type to integer. When the data is entered, connectDaily will verify that what the User put in is really a whole number, and not text, or a number with a decimal point. Keep in mind that this validation only goes so far. There's nothing that will stop Users from entering zero, or a negative number.
Required - If this value is set to Yes, then the user will be forced to enter something in the Field to save the event.
Published - If this value is set to Yes, then the information entered will be visible to Users who are not logged into connectDaily.
Option Values - If you set the input type to Checkbox Group, Radio, Dropdown List, or Select, this is where you enter the options. For example, you want to capture the priority of an event. You could set the form control type to Dropdown List, and then enter options of "Low", "Medium", and "High". Options should each be entered on a separate line.
You may get an error like this:
java.io.FileNotFoundException: http://localhost:8080/calendar/CustomFields.dtd
If this happens, go to the SYSTEM |CONFIGURATION | SYSTEM screen and verify that the URL Base value is correct.